Whether you're considering growing spring tulips, daffodils, hyacinths, or alliums in your garden, our flower bulb planting guide is here to help. In the following post, we'll guide you through the essential steps for planting your bulbs, ensuring you can enjoy their beauty year after year. So, roll up your sleeves, put on those gardening gloves, and let’s get started!
Location: Soil & Sun Requirements
Before you get your hands dirty, it's essential to choose the perfect spot for your flower bulbs.
- Optimal Conditions: Flower bulbs thrive in well-draining soil and need at least six hours of sunlight every day. So, pick a sunny spot in your garden that meets these criteria. That said, many bulbs are tolerant of less than ideal conditions.
- Good Drainage: Proper water drainage is crucial to prevent bulb rot. Excessive moisture and standing water can harm your bulbs, so make sure your chosen area has good drainage.
- Soil Amendments: Be cautious with soil amendments. Some composts and manures can disrupt pH levels, hinder root growth, and lead to bulb rot. Avoid using incompletely decomposed compost, as it may harbor harmful elements.
Planting: Timing, Depth, Spacing, Which-End-Is-Up
Now that you've found the perfect spot, let's get those bulbs in the ground with these planting tips:
- When to Plant: Spring flower bulbs should go in the ground between late September and early November, when the soil cools to around 60°F. Plant them 6-8 weeks before the first hard frost to ensure strong roots.
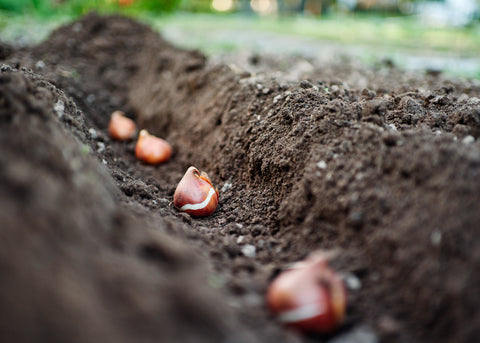
- Correct Depth: In general, plant bulbs at a depth 2-3 times their height. Tulip and daffodil bulbs should be planted 6 to 8 inches deep, with a spacing of 6 inches to prevent tangled roots. Using a auger attachment for your drill or a hand hoe can make the job quick and easy.
-
Proper Orientation: Plant your bulbs with the pointed end facing upward, and the basal plate (the flat side) should be positioned downward. Cover them with 3 to 4 inches of soil, being careful not to damage any emerging sprouts. There's no need to add anything to the bottom of the hole to prevent root damage.

Fall Mulching: Protect and Prepare for Winter
Before the colder months arrive, consider giving your bulbs a little extra TLC with some fall mulching:
- Moderate Mulch: Apply a layer of mulch in the fall to trap soil warmth, retain moisture, and shield your bulbs from temperature swings.
- Suitable Materials: Materials like straw, hay, root mulch or oak leaves are perfect for mulching.
Avoid Container Planting or Raised Beds: Go Directly in the Ground
While containers and raised beds have their merits, bulbs thrive when planted directly in the ground:
- Container Risks: Planting bulbs in containers or raised beds exposes them to temperature fluctuations and freeze-thaw cycles, which can damage roots and bulbs and hinder their growth.
Fertilizing Bulbs: Provide Essential Nutrients
Now that your bulbs are in the ground, let's make sure they get the nourishment they need:
- Timing Matters: Bulbs come with some initial nutrients, but it's a good practice to start fertilizing three times a year after planting.
- Fertilization Schedule: In the fall, opt for organic granular fertilizer to promote root growth. When you see sprouts appearing in the spring, it's time to fertilize again – this time, it's all about foliage and flower development. After your bulbs have all bloomed, give them some post-blooming nourishment to ensure they return in all their splendor next season.
Bloom Times, Size, and Color: Embrace the Variety
- Climate Impact: Your local climate plays a significant role in when your bulbs will bloom. Warmer regions tend to yield earlier blooms, while cooler areas may see blooms a bit later. Temperature and site conditions also affect flower traits.
By following these steps, you'll ensure your flower bulbs flourish and bring vibrant beauty to your garden each year.


