


As the growing season unfolds, your garden becomes a canvas of hope and potential, with seedlings sprouting eagerly to life. To ensure the health and prosperity of your plants, it's time to carve out a moment for the crucial process of thinning. The key to successful thinning lies in the art of patience, so choose a day when your reservoir of patience runs deep. In this blog post, we will take you through the essential steps of thinning your seedlings and explore the benefits it brings to your home garden. From carrots to radishes and lettuce to turnips, embracing this process will lead to healthier plants and a more abundant yield.
Why Thinning Seedlings Matters:
In your well-planned garden plot, you may have sown seeds with the recommended spacing in mind. Yet, some vegetable varieties can be so small that they inadvertently grow too close together. This overcrowding creates intense competition among seedlings for essential resources, hindering their growth potential. Thinning your seedlings is an effective solution to this challenge, offering your plants the space they need to flourish.

Step-by-Step Guide to Thinning Seedlings:
-
Timing is Key: Wait until your seedlings have developed their first true leaves but are still small and delicate. Thinning at this stage minimizes stress on the plants and maximizes their resilience.
-
Identify Seedlings to Thin: Carefully inspect your seedlings and identify those that are too close together. The ideal spacing between seedlings depends on the specific vegetable variety:
- Carrots: 2-3 inches apart
- Beets: 3-4 inches apart
- Radishes: 1-3 inches apart
- Turnips: 4-6 inches apart
- Lettuce: 6-12 inches apart (headed)
Always refer to the seed packet, or "seed facts" tab for each variety on the website, to determine the best spacing for the particular vegetable you're growing.
-
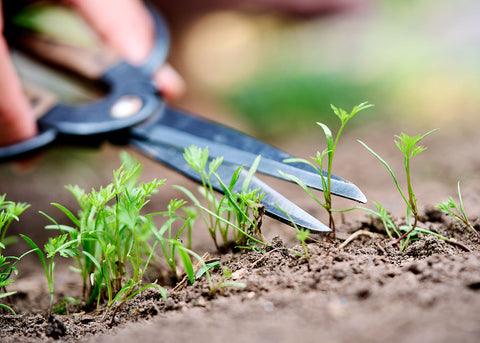
Gather Your Tools: Equip yourself with a pair of sharp gardening scissors. These tools allow for precise cuts and reduce the risk of disturbing neighboring root systems.
-
Gently Cut the Unwanted Seedlings: Avoid the temptation to pull out excess seedlings with your hands. Instead, use your scissors to snip the unwanted seedlings right at the soil surface. The remaining roots and stems that you've pruned will naturally decompose, enriching the soil with organic matter and providing essential air space for the chosen seedlings.
-
Preserve the Clippings: Either compost the thinned seedlings or savor the microgreens for your next snack.
- Watering after Thinning: Once the thinning process is complete, water the remaining seedlings gently. This helps settle the soil and provides the seedlings with the moisture they need to recover from any minor disturbances caused during thinning.

Examples of Vegetables to Thin:
Thinning is especially vital for root vegetables like carrots, beets, radishes, and turnips, as it ensures proper spacing, prevents misshapen roots, and encourages healthier growth. Additionally, thinning lettuce is essential for achieving full head development, while baby greens may not require thinning. Embracing the practice of thinning guarantees that your home garden thrives with abundant and flourishing produce.
Explore Our Garden Tools for a Successful Harvest:
Among our collection, you'll find both large and small Barebones gardening scissors, perfect for thinning and harvesting leafy greens. Check out all our gardening hand tools in our shop! Shop all of our gardening hand tools here!